• Email
  • Facebook
  • Flickr
  • Instagram
  • LinkedIn
  • Pinterest

Better Off Thread

  • home
  • about me
  • Blog
  • free patterns
  • teaching
  • shop
  • 0 items$0.00

Paper-piecing Curved Geese: A Tutorial

11 Jun

This tutorial is step one in the photo tutorial for making my Spiral Geese Mini Quilt Pattern.  You can also use this tutorial for piecing the geese in my New York Beauty Circle of Flying Geese Pattern.

•••

Before you begin:

  • Cut all your fabrics out according to the pattern.  The smaller squares are for templates A & H and the larger squares are for templates B-G.
  • Shorten your stitch length to about a 1.5.
  • Print out your paper templates at 100%.
  • Please read through the entire tutorial before beginning (or at least read the tips at the bottom!).

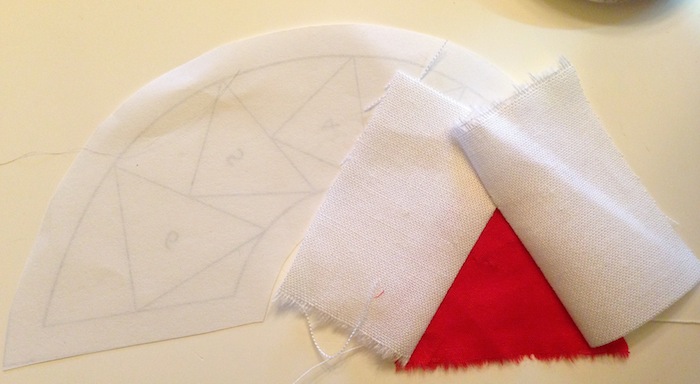
I will be referring to the geese fabric as the “red fabric” (yours will probably be a color or a print) and I will be referring to the background fabric as the “white fabric”.

photo 1

1. Cut all your paper templates out along the gray seam allowance line.

step1

2. On the BACK (unprinted) side of template A, place a red square (right-side-up) over triangle #1.  The fabric square should completely cover the entire triangle and there will be at least 1/4″ extra on all sides.

(I superimposed the template lines, so you can see the placement.)

step2

3. Next, place a white square (wrong-side-up), so that edge is about 1/4″ over your first stitching line. (It doesn’t matter if you choose to sew the left or the right side first.) Pin through all layers.

step3

4. Turn your template over and sew along your first stitching line.  Make sure you extend your seam about 1/4″ on either end and back-stitch.

step2.1

5. Trim the seam allowance down to 1/4″.  You can use either scissors or a rotary cutter, but make sure you fold your paper template out of the way!

step4

6. Flip your white square so the right side is out and gently press with a dry iron.

step5

7. Next, place another white square (wrong-side-up) so that the edge is 1/4″ over the 2nd stitching line.   Pin.

step6

8. Flip your template and sew along 2nd stitching line.

step7

9. Trim seam allowance to 1/4″, flip and press.  Look, it’s a flying geese(or is that a goose?).

step8

10. Now, place a red square (wrong side up), so that the edge is about 1/4″ over your next stitching line. Pin.

step9

11. Sew it, trim the seam allowance, press it and continue repeating your steps until you have sewn all the geese.  Repeat for all templates.

photo 2

Trim the excess fabric off along the seam allowances.

You have completed step one!

Tips:

  • If you have never paper-pieced before, I suggest you begin with template D, E or F. They are the largest and least curved.
  • Paper-piecing will feel very backwards at first.  I promise that it will get faster, as you get used to it.
  • Always make sure your fabric square will entirely cover the area you want it to, once it is flipped over. If you are worried, sew with a basting stitch first, check the fabrics and then sew it again on the small stitch.

step10

On your curviest templates, you will want to make sure you end your stitches in the seam allowance. If you sew too far, you’ll sew right back into the geese.

step11

You can see how I trimmed the seam allowance, so that it doesn’t extend too far.

I hope this is all clear!  Email or comment, if you have any questions.

Next up is Part 2: Reverse Appliqué (which will be the final step in completing the  Spiral Geese Quilt Top).


  • Click to share on Pinterest (Opens in new window) Pinterest
  • Click to share on Facebook (Opens in new window) Facebook
  • Click to share on X (Opens in new window) X
  • More
  • Click to share on Tumblr (Opens in new window) Tumblr
  • Click to email a link to a friend (Opens in new window) Email
  • Click to share on LinkedIn (Opens in new window) LinkedIn

Comments:
42 Comments
Categories:
turtorials

SIGN-UP FOR MY NEWSLETTER

Updates on pattern releases, discounts and more!

« Sew Cute Tuesday
Modern Mini Challenge »

Comments

  1. Teje says

    June 11, 2013 at 10:13 pm

    Hi Janice! Great tutorial and I love your quilt! Congratulations again (got my vote)! x Teje

    Reply
  2. Judy Hudgins says

    June 12, 2013 at 8:05 am

    Thanks for the tutorial. Very clear and a great refresher for paper piecing.

    Reply
  3. Pat says

    June 12, 2013 at 9:48 am

    Thanks for this wonderful tutorial! … 🙂 Pat

    Reply
  4. becky says

    June 12, 2013 at 1:15 pm

    Where do I go to print the pattern?

    Reply
    • Diana says

      June 12, 2013 at 3:06 pm

      You can find it on Craftsy website under patterns, it is in the TRENDING section, which means it is quite the rage!

      Reply
  5. Diana says

    June 12, 2013 at 3:05 pm

    Finally got the pattern, ( my computer’s fault, not Craftsy’s) and I am sewing on this now! I am so excited. Love this pattern and Mini’s are a favorite of mine… Thanks so much for sharing! You are the best!

    Reply
  6. Beth says

    June 12, 2013 at 7:30 pm

    Wow – your directions are so clear – you explain it all so well! Great tutorial.

    Reply
  7. Green says

    June 15, 2013 at 7:52 am

    Oh my gosh! I give you kudos for sewing this. I can’t even think about something so detailed in this heat that I am having. I would like to try something like this later – in the Autumn – when I can clearly think.
    Great tutorial, though. I’ve done a bit of paper-piecing lately and some of those small geese and small background pieces are a pain, I can tell.

    Reply
  8. Patty Wilckens says

    April 30, 2014 at 4:42 am

    Thank you so much for this tutorial. It is very easy to understand, considering I am a beginner.
    Will try TODAY!
    Patty

    Reply
  9. Lisa says

    June 16, 2014 at 5:23 pm

    I found your quilt on a friend’s page. My mom is making it for me…it looks like a cochlea. I am deaf and have a cochlear implant…so this is very cool for me! Thanks for sharing!

    Reply
  10. Jenny Strong says

    January 28, 2015 at 9:50 am

    How can I buy the pattern – i live in the UK and the form did not like my postcade nor that I did not have a state! Help please.

    Reply
  11. baise hard says

    February 4, 2015 at 11:01 am

    Εncore un poste clairement instructif

    Ӎy website – baise hard

    Reply
  12. salope sexe says

    February 4, 2015 at 11:01 am

    Мaցnifique post, une fois de plus

    Herre is mу homepaցe: salope sexe

    Reply
  13. confection de chemise says

    March 21, 2015 at 6:22 pm

    Wonderfl article! Ԝе will bе linking to this great article оn our site.
    Keep up the grеɑt writing.

    mү Һomepage … confection de chemise

    Reply
  14. Gina says

    November 3, 2015 at 8:43 am

    I realy love this and would like to make it. however like other readers in the UK I have problems accessing the pattern is it in printed form in a publication? Or could you tell me how to download it without a USA address. Many thanks Gina

    Reply
  15. kontol says

    November 14, 2015 at 3:09 am

    Quality articles or reviews is the main to interest the users to pay
    a visit the web page, that’s what this site is providing.

    Reply
  16. Claudia Barbosa says

    July 7, 2016 at 9:36 am

    You don’t exist!
    You are inspiring me,so much , with your tutorials (that I want to do all I can) and making up my days so happy. Thank you!

    Reply
  17. Marilyn says

    December 28, 2016 at 3:19 pm

    I’m considering outlining the geese spiral with narrow black bias tape. Should this be done after the reverse applique is sewn on, or before? Wouldn’t the reverse applique have to be re-cut to fit if I sew on the black tape first?

    Reply
  18. Robyn Kirsch says

    May 24, 2017 at 6:56 pm

    The Craftsy link isn’t working. Is there somewhere else I can purchase this pattern?

    Reply
  19. proxy free list says

    June 11, 2017 at 6:41 pm

    Hi,I read your new stuff named “Pinterest” regularly.Your humoristic style is witty, keep it up! And you can look our website about proxy free list.

    Reply
  20. Cantin Marie-Anne says

    July 26, 2017 at 3:57 am

    Merci beaucoup !ce tutoriel est génial ! je n’osais pas me lancer dans ce type de patch ! les arrondis quel tracas !
    amitiés

    Reply

Trackbacks

  1. Reverse Applique Tutorial | better off thread… says:
    June 18, 2013 at 8:09 pm

    […] Step one: Paper-piecing Curved Geese is here. […]

    Reply
  2. Gaggle of Geese Pattern! | better off thread… says:
    January 2, 2015 at 9:53 am

    […] but it really is not difficult.  You should have some paper-piecing experience, or check out my paper-piecing tutorial.  This is pretty basic paper-piecing, so beginners can surely do it.  Also, you will need to sew […]

    Reply
  3. On The Go Quilting » Friday Finds, August 7 says:
    August 6, 2015 at 8:40 pm

    […] HERE is a paper-pieced tutorial for Curved Geese.  I love this design and can’t wait to try it.  […]

    Reply
  4. w88plays.com says:
    July 29, 2021 at 5:19 am

    w88plays.com

    Paper-piecing Curved Geese: A Tutorial

    Reply
  5. marc jacobs leather tote says:
    January 26, 2022 at 12:57 pm

    marc jacobs leather tote

    Paper-piecing Curved Geese: A Tutorial

    Reply
  6. 12 digital caliper mitutoyo says:
    January 26, 2022 at 11:08 pm

    12 digital caliper mitutoyo

    Paper-piecing Curved Geese: A Tutorial

    Reply
  7. bag handle says:
    January 27, 2022 at 7:28 am

    bag handle

    Paper-piecing Curved Geese: A Tutorial

    Reply
  8. betsey Johnson leather wallet says:
    January 27, 2022 at 8:09 pm

    betsey Johnson leather wallet

    Paper-piecing Curved Geese: A Tutorial

    Reply
  9. swiss watches says:
    January 27, 2022 at 11:35 pm

    swiss watches

    Paper-piecing Curved Geese: A Tutorial

    Reply
  10. egyptian women's clothing says:
    January 28, 2022 at 9:44 pm

    egyptian women’s clothing

    Paper-piecing Curved Geese: A Tutorial

    Reply
  11. davina mccall my three 30-minute workouts says:
    January 29, 2022 at 8:43 am

    davina mccall my three 30-minute workouts

    Paper-piecing Curved Geese: A Tutorial

    Reply
  12. top handle crossbody bag says:
    January 29, 2022 at 4:41 pm

    top handle crossbody bag

    Paper-piecing Curved Geese: A Tutorial

    Reply
  13. women's clothing sales Online says:
    January 29, 2022 at 10:14 pm

    women’s clothing sales Online

    Paper-piecing Curved Geese: A Tutorial

    Reply
  14. franchising videogiochi says:
    January 30, 2022 at 11:58 pm

    franchising videogiochi

    Paper-piecing Curved Geese: A Tutorial

    Reply
  15. quiet says:
    March 3, 2022 at 4:33 am

    quiet

    Paper-piecing Curved Geese: A Tutorial

    Reply
  16. Coach Graduate Students says:
    July 10, 2022 at 10:00 am

    Coach Graduate Students

    Paper-piecing Curved Geese: A Tutorial

    Reply
  17. шампунь missten says:
    July 19, 2022 at 8:15 am

    шампунь missten

    Paper-piecing Curved Geese: A Tutorial

    Reply
  18. светильник says:
    July 25, 2022 at 12:22 pm

    светильник

    Paper-piecing Curved Geese: A Tutorial

    Reply
  19. eelleebeauty.Com says:
    August 21, 2023 at 2:29 am

    eelleebeauty.Com

    blog topic

    Reply
  20. https://invest.permraion.ru/js/inc/organizaciya_pohoron_shag_za_shagom.html says:
    October 26, 2023 at 9:57 pm

    https://invest.permraion.ru/js/inc/organizaciya_pohoron_shag_za_shagom.html

    Paper-piecing Curved Geese: A Tutorial

    Reply
  21. купить кун на мтз says:
    November 9, 2023 at 5:52 am

    купить кун на мтз

    blog topic

    Reply

Leave a Reply to Gaggle of Geese Pattern! | better off thread… Cancel reply

Your email address will not be published. Required fields are marked *

This site uses Akismet to reduce spam. Learn how your comment data is processed.

© 2025 Better Off Thread