
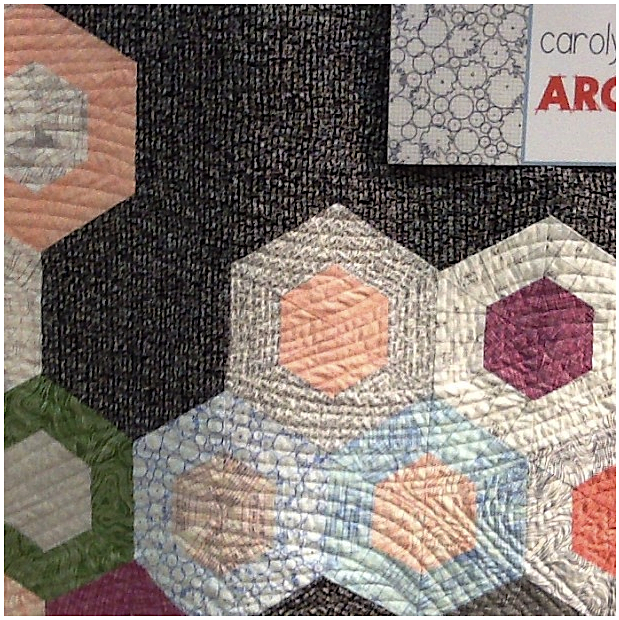
A few people asked me for more information on how I quilted my “Geese in the Forest Quilt“, so I thought it would be easiest to do a little tutorial. I drew my method out on paper, so you can see my thought process.
I was originally inspired by this quilt and I used it as a model to quilt the “Science Fair” quilt for Robert Kaufman.
My suggestions for doing ultra-wavy line quilting:
• Use the walking foot on your machine
• Spray baste your layers together. I spray basted “Science Fair” and it turned out much smoother than “Geese in the Forest”, which I pin basted. I normally pin baste, but I won’t if I use this method again.
• My lines were between 1/2″-1″ apart. Variety in width is encouraged and creates more interest, so don’t worry about your lines all being an exact width apart.
• Take lots of breaks! You are really using your upper body with this type of quilting, since you need to move and turn the entire quilt through the machine.
• If you are hesitant to get started, draw your pattern out on paper first.
•••
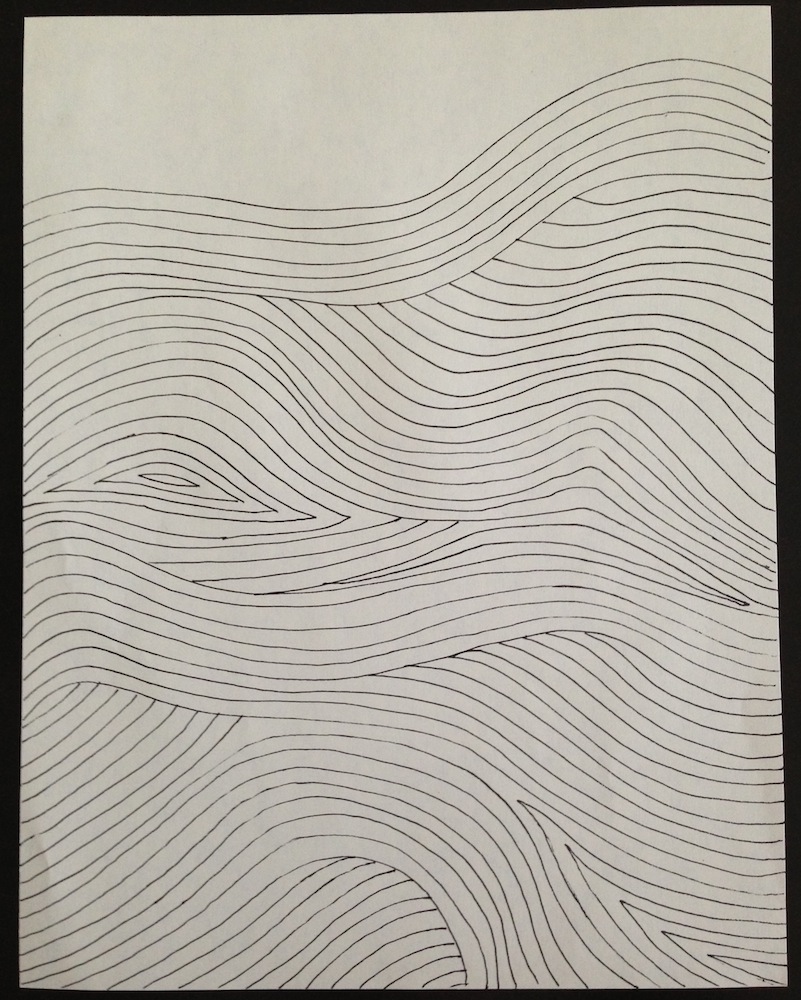
Below is an example of how I might quilt with wavy lines. Each time will be different, but you can get an idea of steps to take.
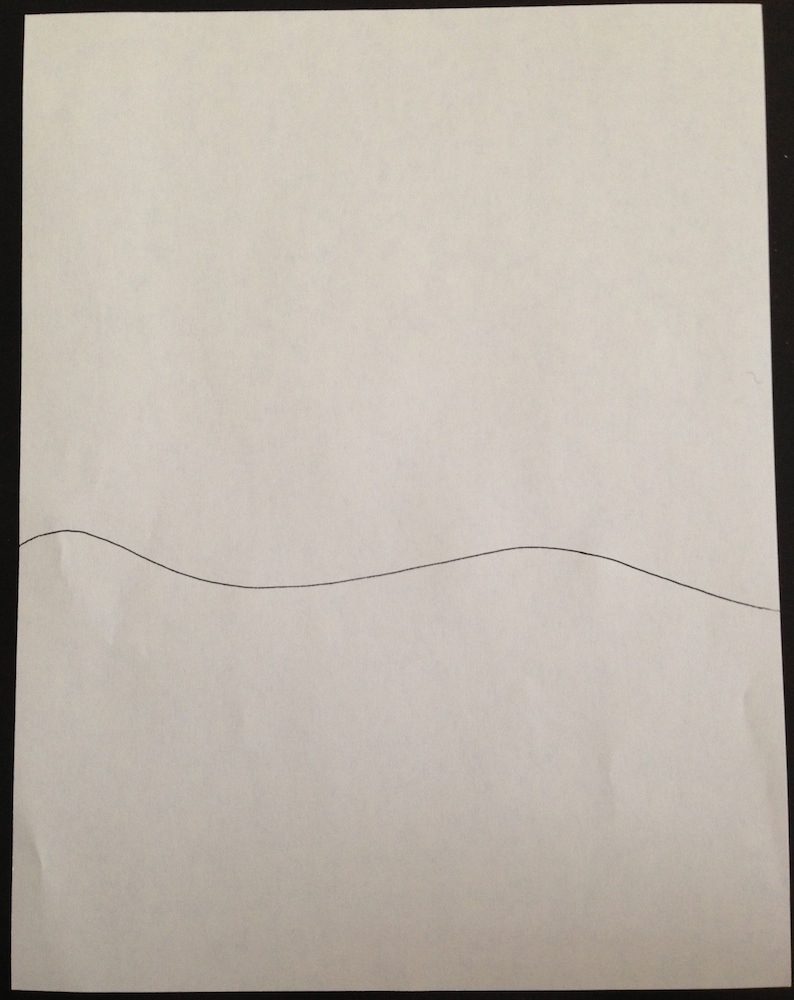
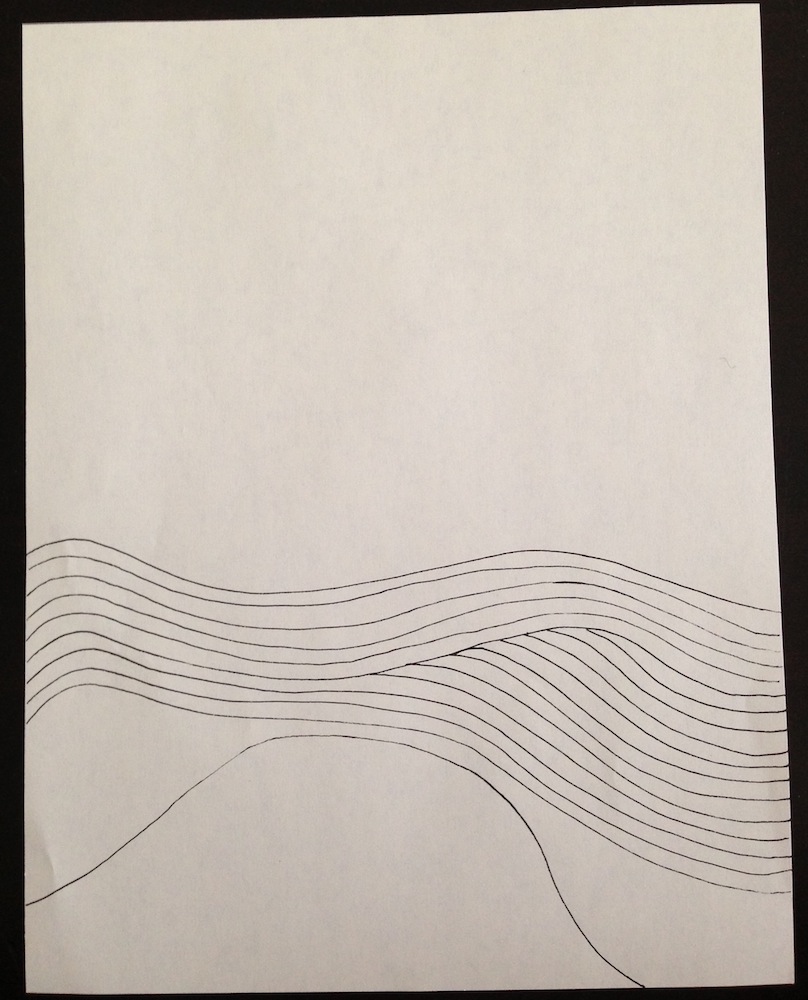
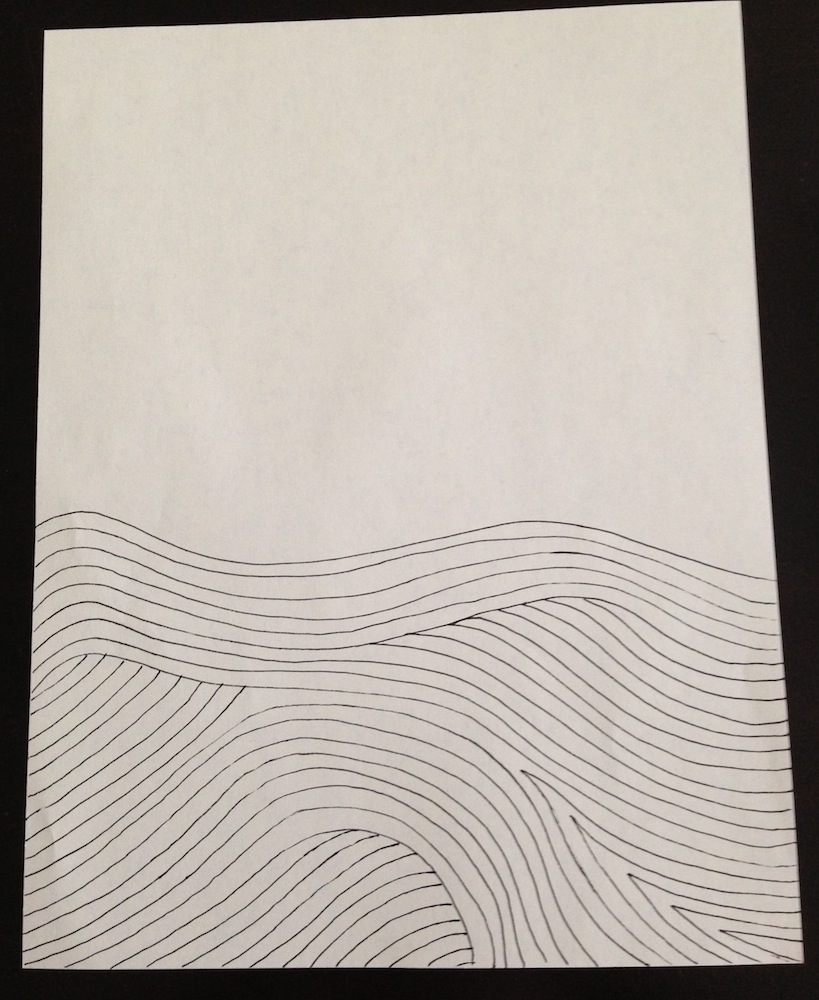
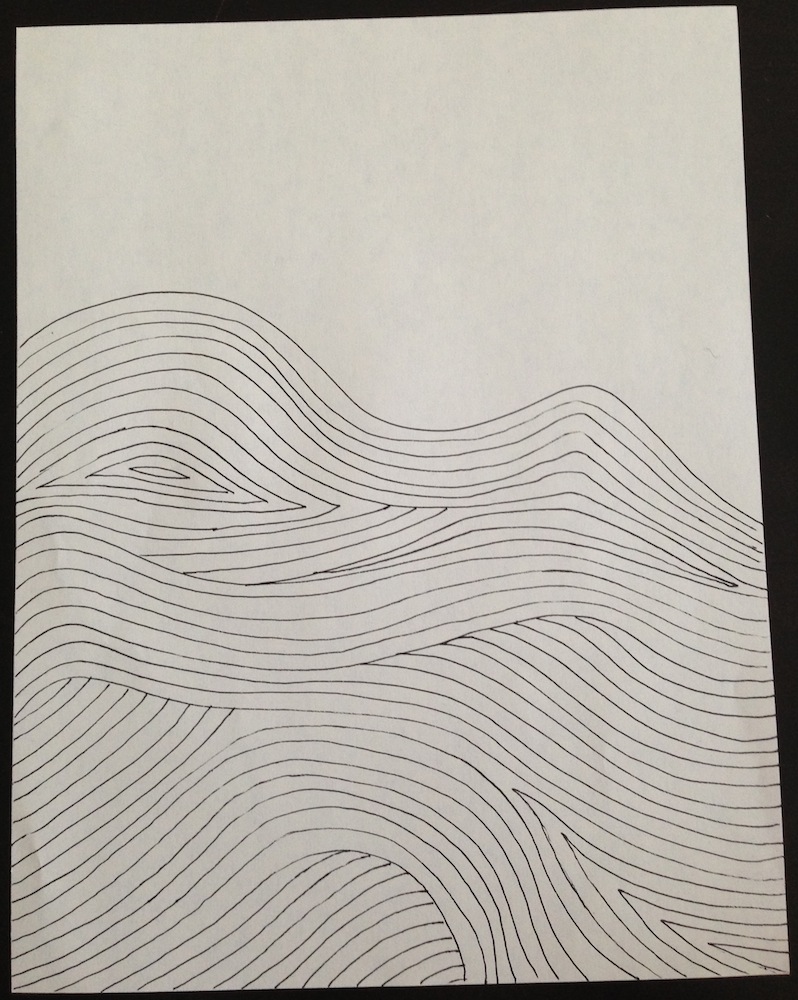
Start by sewing a somewhat wavy line near the center of your quilt.
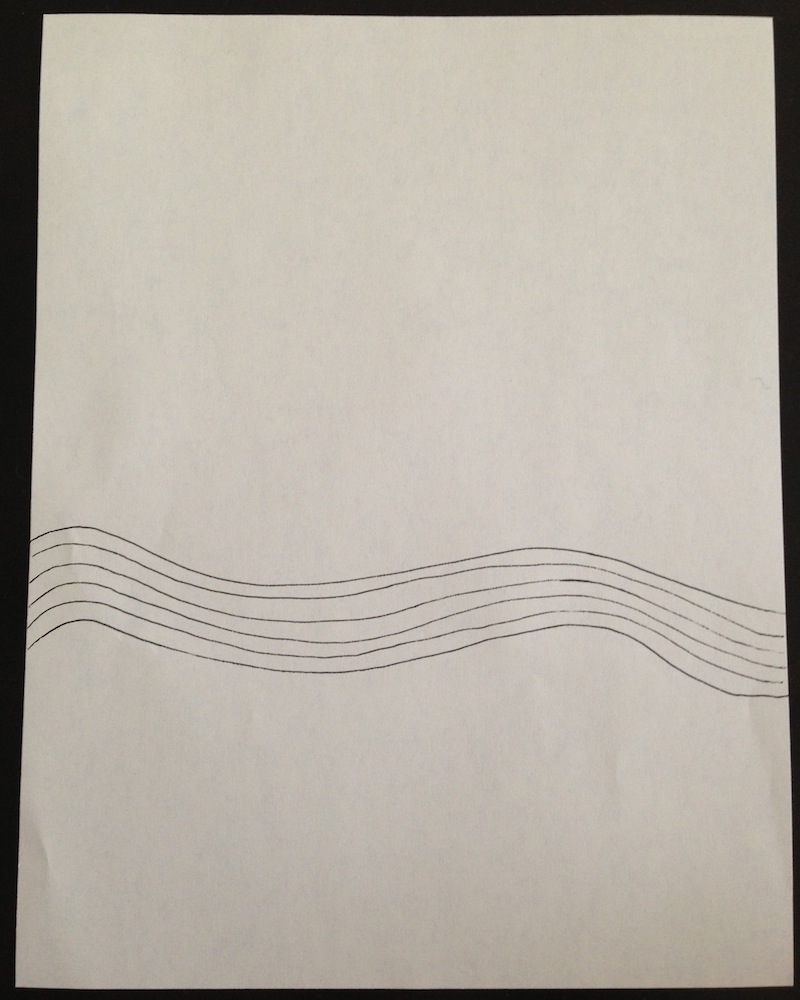
Echo quilt your wavy line several times.
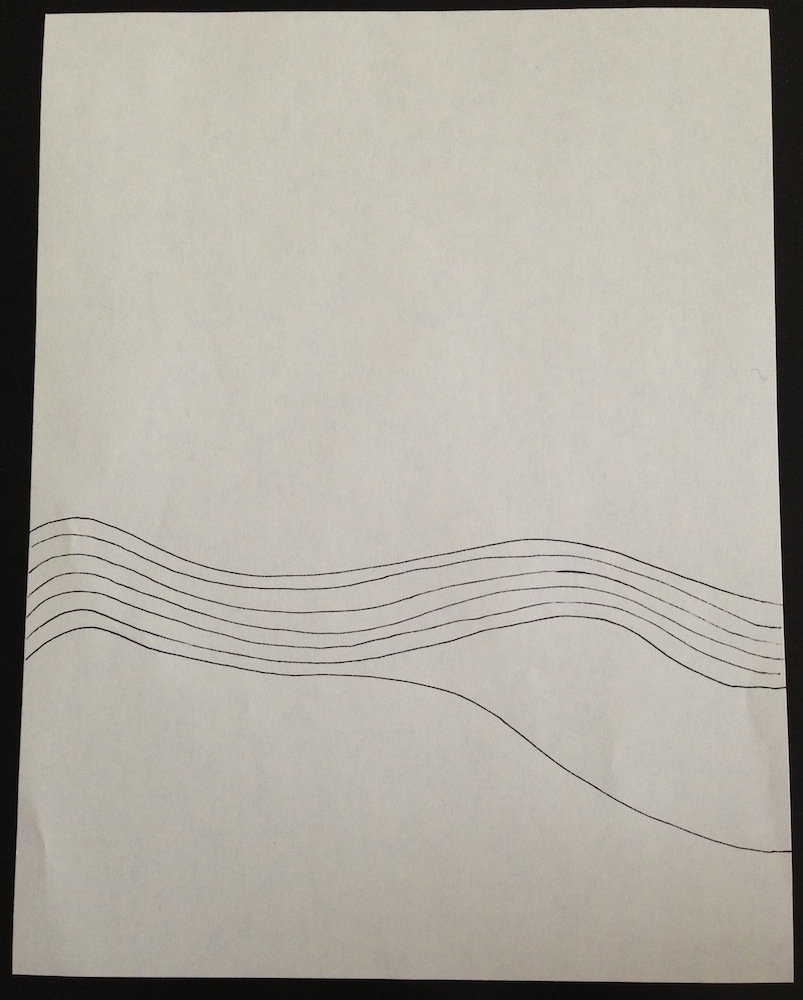
Start echo quilting your original line again, but this time veer off in an different direction partway through.

Fill in the negative space you created by sewing lines going in a different direction than the original lines.
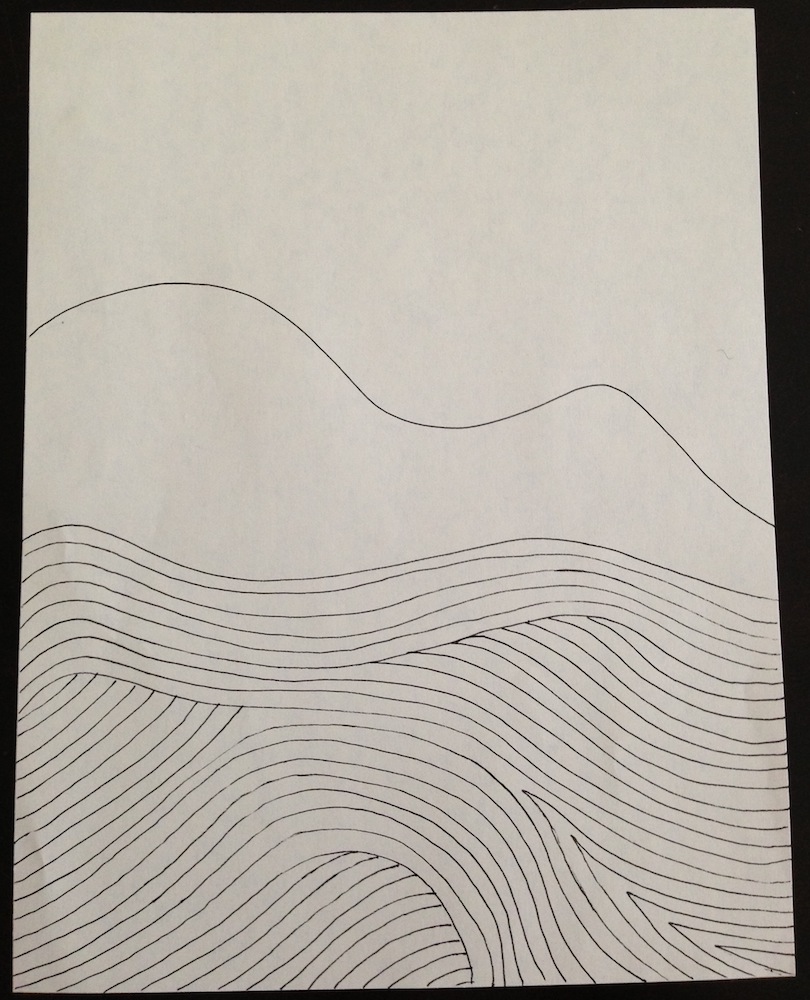
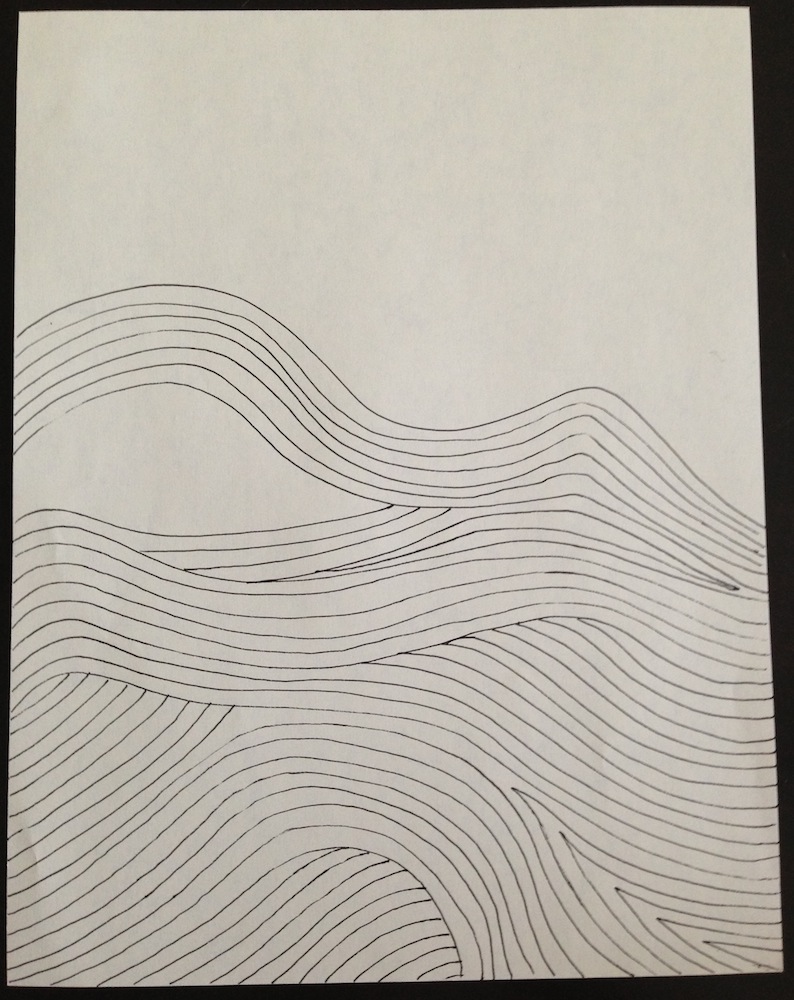
Draw a really wavy line below your first set of lines.
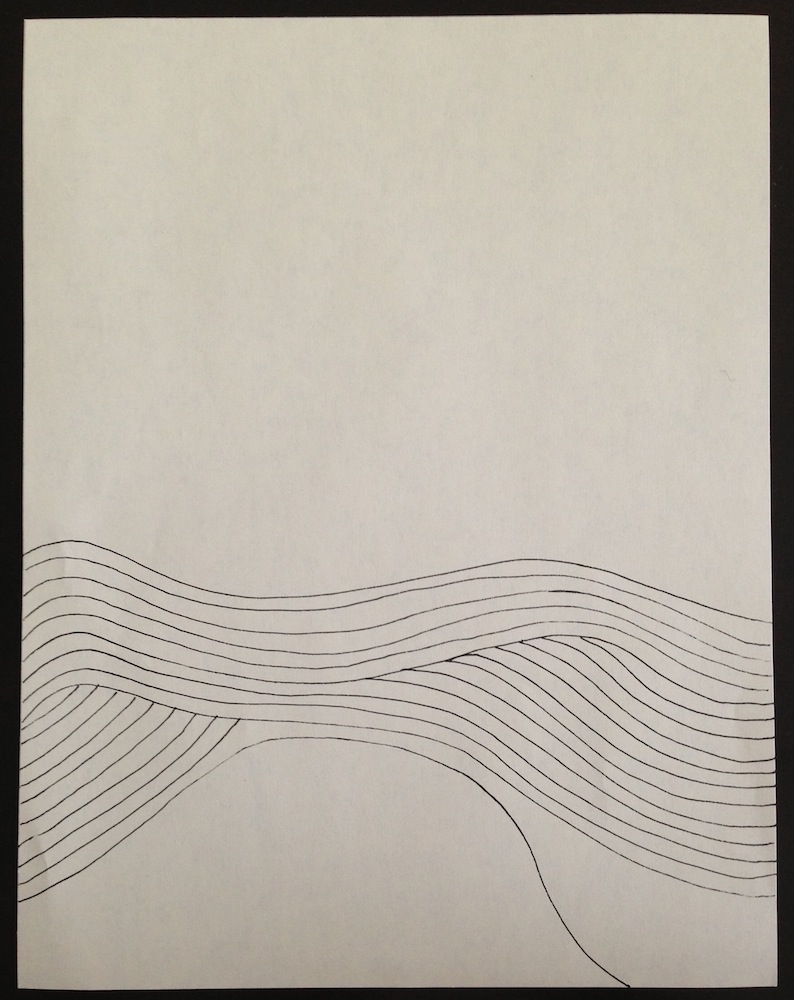
Fill in the left side with lines echoing the new line and ending at the old line.
Echo your lines on the right side, but this time turn your quilt before you intersect the old line and sew back out to the edge, making a wood-grain effect.
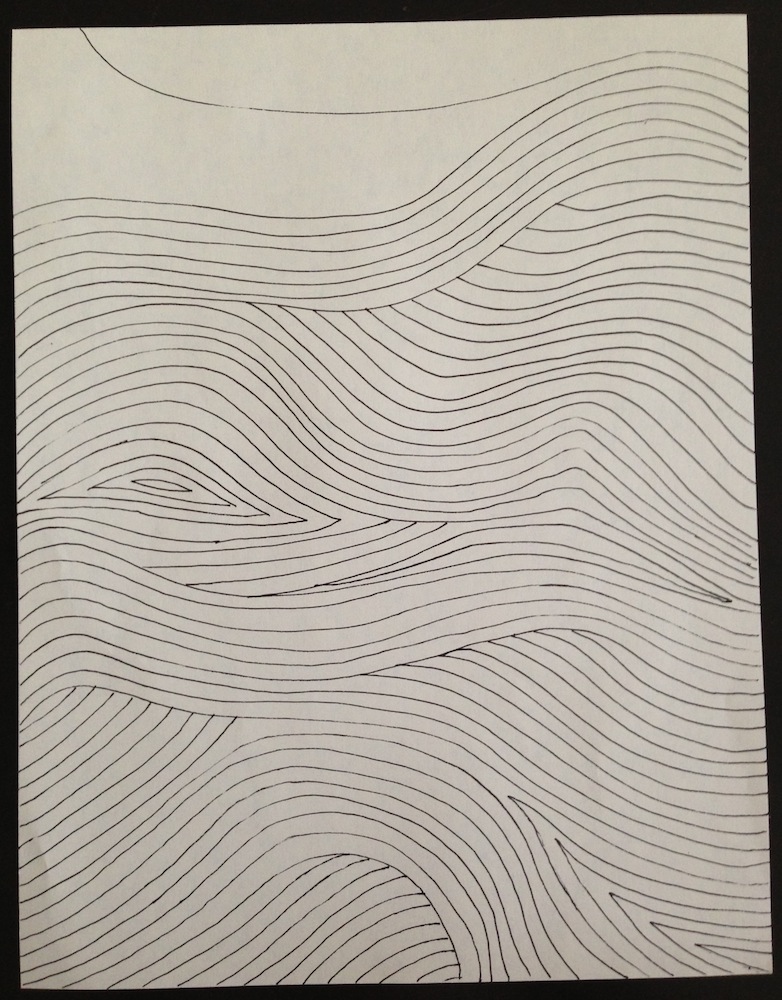
You are aiming for variety in your waves and lines, so you don’t want to fill in spaces the same way every time.
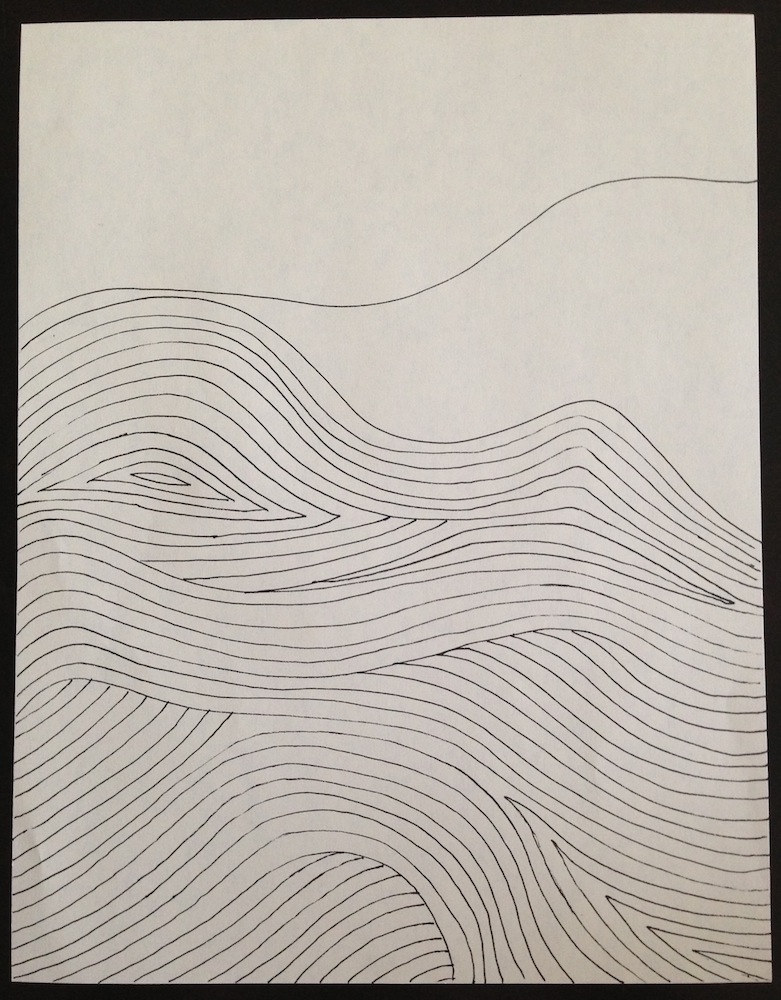
Now, echo quilt your arched line several times, working your way towards the lower edge.
Fill-in the space that is left with shorter lines that intersect with your arch.
Sew another wavy line near the center of your quilt.
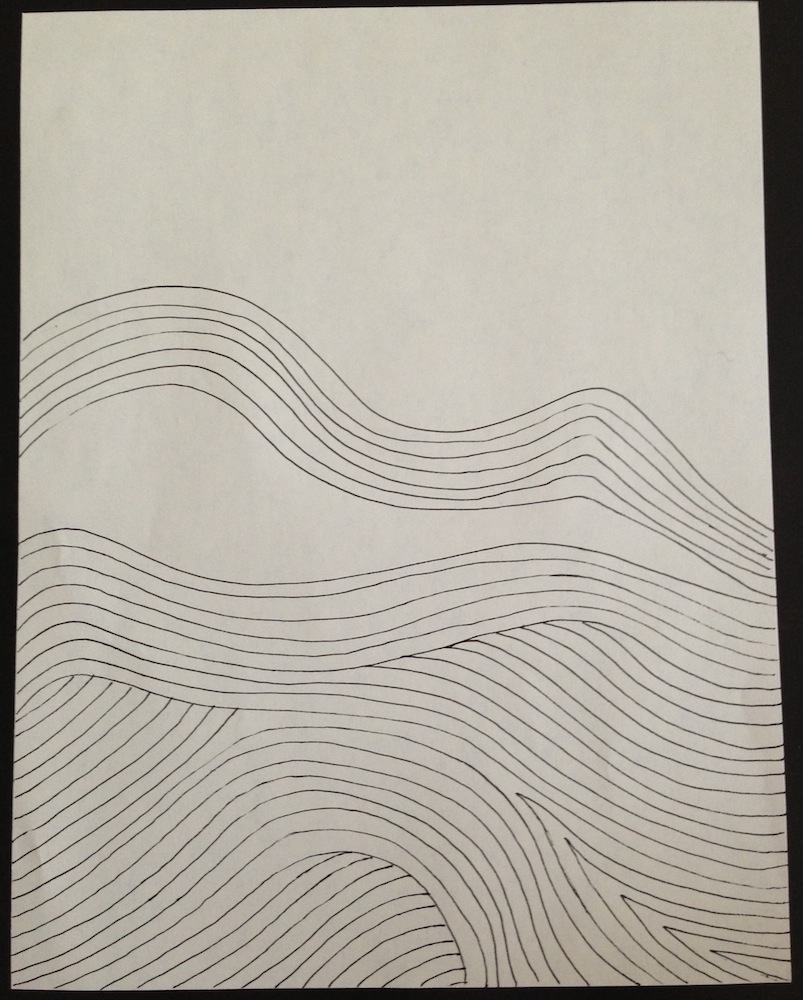
Echo the line several times.
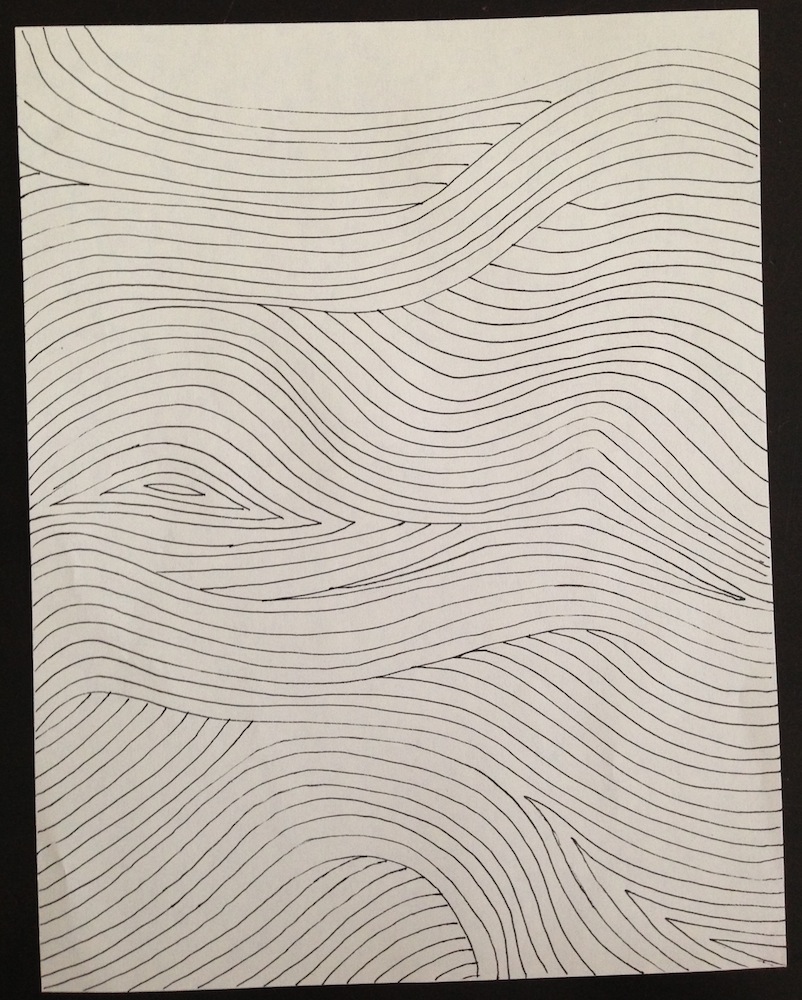
I always like each line to be echoed several times to give it weight. You never want a single lone line in your quilt with no echoing.
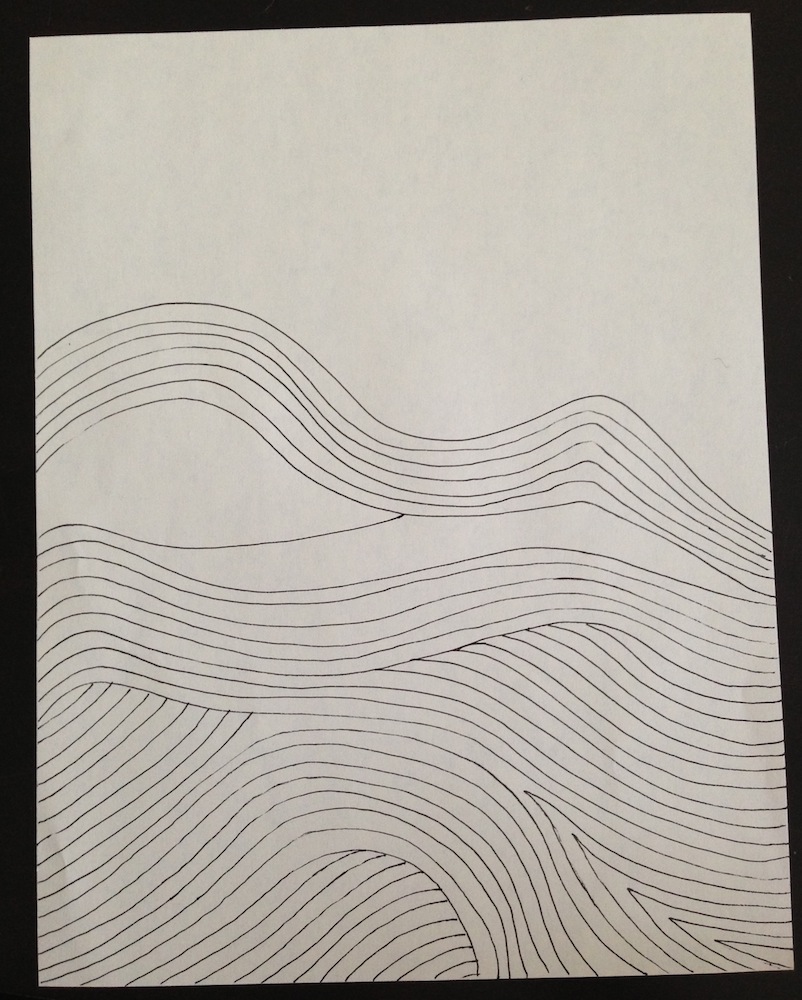
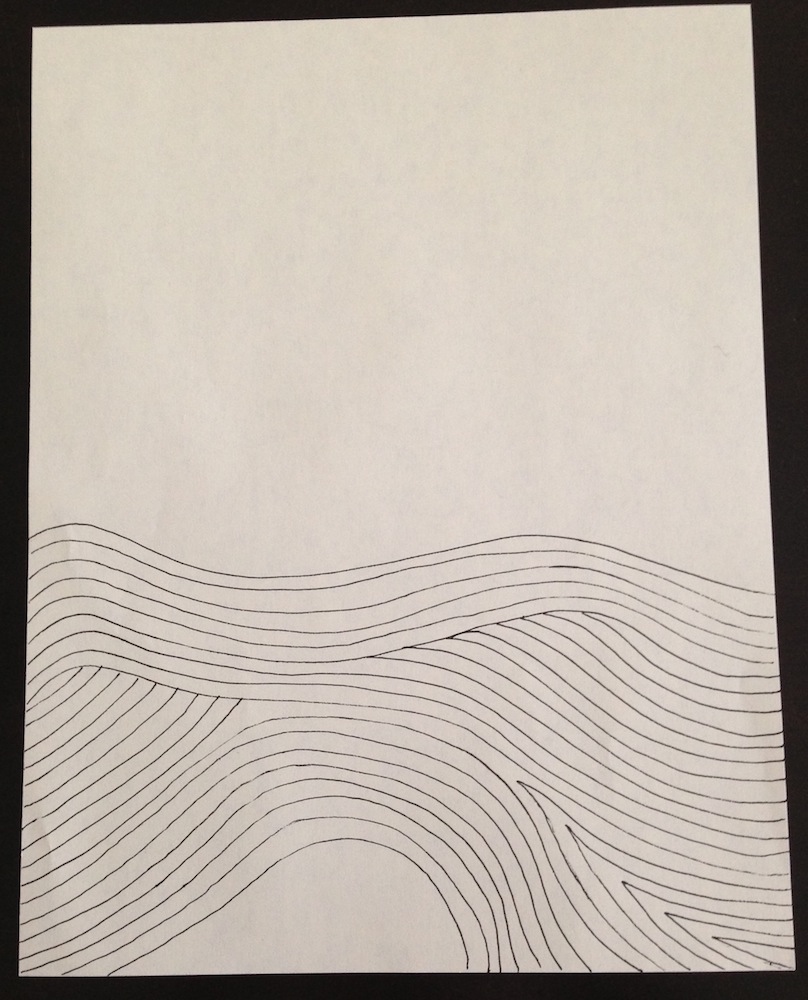
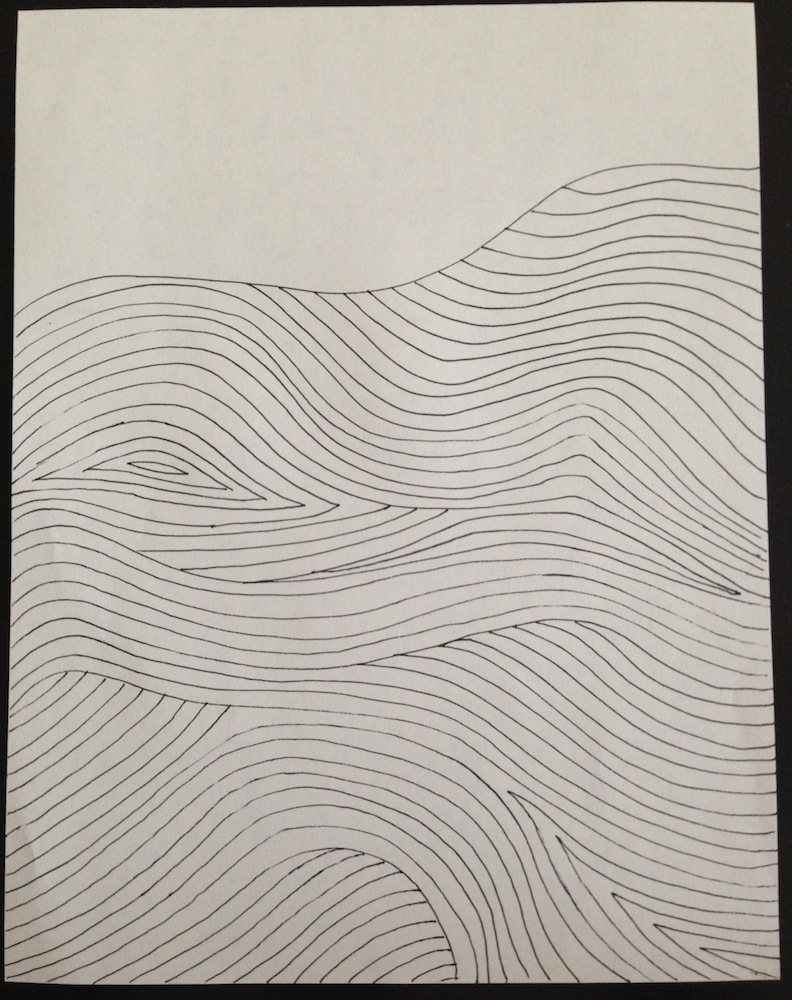
Start to echo your original line and then split the negative space in half.
Fill-in the inner half of the negative space with echoing lines.
Fill in the outer half of the negative space with wood grain lines.
Sew a wavy line that stars by echoing and then veers off in a different direction.
Fill in the space created with echo lines.
You have a single lone line, so make sure you echo it several times to give it more weight.
Divide your negative space again by sewing a line that starts off as an echo and then veers off in another direction.
Fill in the negative space with echo quilting.
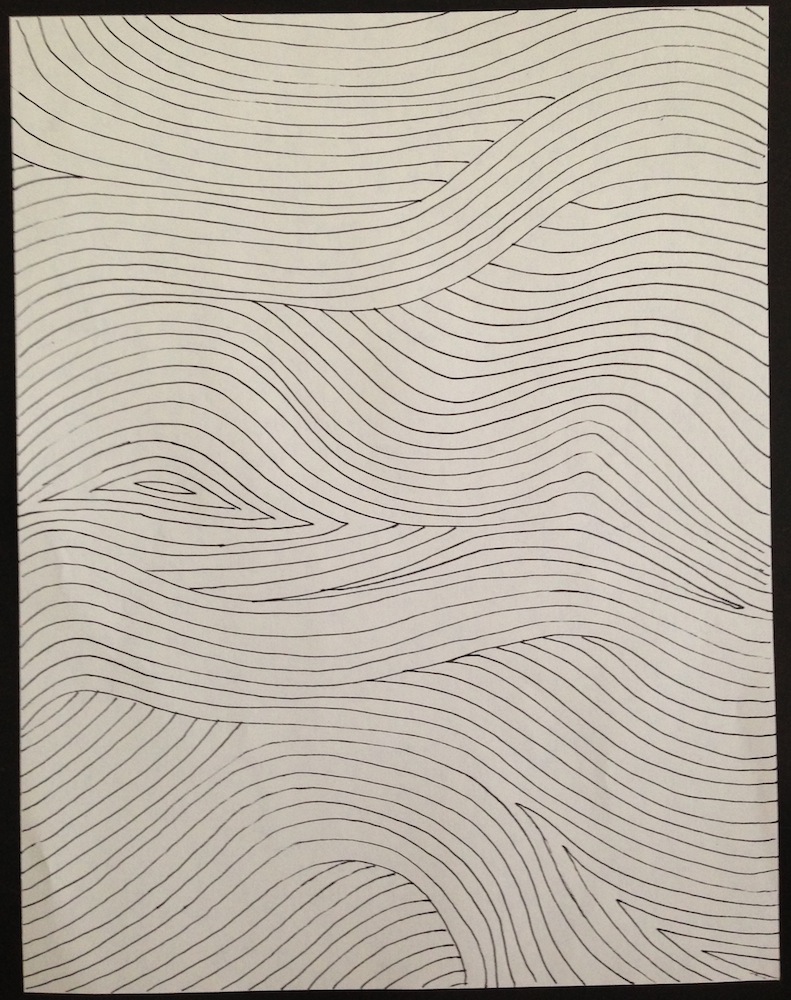
Continue to fill in the remaining space with echo quilting.
You are done! Bind, wash and enjoy after soaking your aching back and arms in a hot bath. Oh, and send me a photo!
Seriously cool Janice. Thanks for doing this!
Cant wait to do this so cool
Brilliant. Just a quick question…do you change what side of the quilt you start on, when doing several wavy lines that go all the way across?
Love this quilting. I’ve got it bookmarked ; )
No, I don’t like to take the extra time turning the quilt to go the opposite way.
Thank you for this tutorial. I like the idea of drawing a line. Want to try this soon.
Janice, your quilt is so beautiful! Thank you for sharing how you quilt it – this was very good to see! x Teje
Fantastic – thanks so much Janice. I can’t wait to get a sore back and arms trying this out!!
Thanks so much. When you see it fpdrawn out like this as a process, it makes sense and doesn’t seem quite so crazy unattainable. Might give it a go. Thanks for the inspiration!
E xx
oh my gosh, it looks fabulous!! I will totally try this out when I get a chance – bookmarking this tutorial now! 🙂
Great tutorial. Did you bury your threads by hand tying them or by stitching in place? Great job! Thanks for sharing.
I buried the threads for the “Science Fair” quilt, but I just back-tacked for the “Geese in the Forest Quilt”. The back-stitching doesn’t show up on the white fabric and it was much faster than having to bury all those threads!
Wow this makes it look so easy! I do love using my walking foot. 🙂
Thanks for the tutorial Janice! I love this quilt and your quilting made it even more beautiful!
This is great. Thank you for expalining it to us! I have one question. Do you tie off the ends when you reach the row above or just backstich a couple of stitches? I know you wouldnt have to if you are going all the way across, but on the short rows that end or start in the middle?
Hope this question makes sense.
Thanks again!
For the “Science Fair” quilt I tied off all the ends. For the “Geese in the Forest” quilt, I just back-tacked. it was mostly white on white, so it doesn’t show, plus it was SO much faster!
So awesome and so gonna try it! 🙂
Your poitsng lays bare the truth
Great tutorial! That’s pretty much how I did it. 🙂 Thanks for linking to me! I’m honored you got inspiration from lil’ ole’ me. 🙂
Thank you for the great tutorial! I used this method on my Geese in the Forest quilt and it came out great. Pictures here: http://www.pinterest.com/pin/237213105346666802/
and here: http://www.pinterest.com/pin/237213105346666801/
I absolutely LOVE this! I have some Winter’s Lane fabric panels that I want to quilt in an interesting way and make into pillows. This is perfect! Thanks for the pictures!
Hi Janice! I will be trying this out in the next couple of days and I’m curious if you have experimented doing the lines in more of a vertical manner?
Thanks for the tutorial! Here’s a quilt I quilted using it as inspiration: http://www.quiltsofafeather.com/2014/04/d9p-for-kenya-quilt-finished.html
Thanks so much for the tutorial. I’m using it to quilt quite a large quilt (might have been over-ambitious with my second ever quilt!) and I’m having a lot of fun. It looks beautiful but I need to find someone to help me bury all the ends!! I’m thinking that there must be someone on the planet who actually likes doing it 😛
Super great directions – I can’t wait to try. Always wondered how you’d start this type of quilting. Now I know. Thanks so much for sharing with us.
Thanks so much for your tutorial, I used it to finish up this baby quilt for a friend. You can check out some pictures here.
http://mommaandherhelpers.blogspot.com/2015/06/friday-finish-wavy-line-quilt.html
Would this work well on QAYG blocks? I find it very difficult to manage a whole quilt on my sewing machine but I really like the effect of this quilting. Thanks, Rieann
thanks for the tute
Thank you Janice for this tutorial. I have just quilted a small quilt with it. Here is a photo in my flickr album:
https://www.flickr.com/photos/46601854@N05/26063715605/in/dateposted-public/
How lovely of you to take the time to draw this out, photograph it and share it with all of us! You ROCK~!
Many Thanks,
LuAnn in Oregon
luannkessi.blogspot.com
Such great timing finding your post just now. I’m just about to start a “baby” quilt which will look like a Cronulla Sharks football jersey (Australian NRL team). This design will be absolutely perfect for the plain section – I’m hoping I might be able to sneak in a shark or two in amongst the “water” – and maybe even a couple of footballs. I’m excited.
Janice,
Thank you so much for the tutorial. I was looking up a file on my computer and saw “wavy”, but didn’t know what it was. I opened it and it was your tutorial I had saved and unfortunately forgotten. So glad I opened it. I love your tutorial and your quilting is beautiful!
I hope you get this comment, after all it has been a few years since you wrote it!
Thanks again,
JulieAnn
I did this quilting on one of my quilts. It has made a simple pattern quilt look beautiful imo. Thank you for your tutorial.
WOW! Great tutorial – thank you for uper quick & simple idea for quilting!
I just love your Wavy quilting and used it on a quilt for my nephew’s new baby. The quilt is a copy of their favourite football team jersey on the front and as they are Cronulla Sharks I wanted something that looked a bit like water for the plain part of the “shirt”. The wavy quilting worked perfectly. Also looked good on the back with the Nemo print fabric. I’d like to send a ;photo, but not sure how.