• Email
  • Facebook
  • Flickr
  • Instagram
  • LinkedIn
  • Pinterest

Better Off Thread

  • home
  • about me
  • Blog
  • free patterns
  • teaching
  • shop
  • 0 items$0.00

Jen Ski Alphabet Wall Art

26 Jun


I’ve been working on the nursery for awhile now and I am always trying to find ways to cut costs and feed my thirst for craft.  I also love to have art that is original and unique.  When I saw this adorable Alphabet Art Display on Tiny Decor Blog I was smitten.  

The Alphabet cards are from Michael’s and are designed by Jen Ski for K&Company.  I went to my local Michael’s to pick some up and they had EVERYTHING in the Actopus to Zelephant Collection except for the cards.  It was ok, because I actually wanted the art to hang on either side of the large window in the nursery, so I didn’t need to make my piece as large as the one on tiny Decor.  That was when I found stickers from the same Jen Ski collection that would be perfect for two smaller-scale wall hangings.
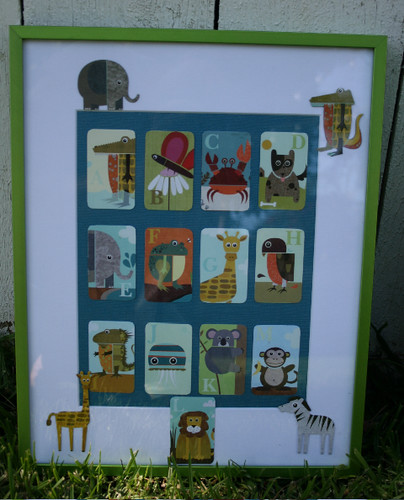


Above are the finished alphabet wall hangings.  I couldn’t fit all the cards within the mattes, so I placed the “L” and the “R” at the bottom, which are the baby’s initials. 

Here is how to make your own Alphabet Card Art like mine (All supplies are from Michael’s):

Supplies: 
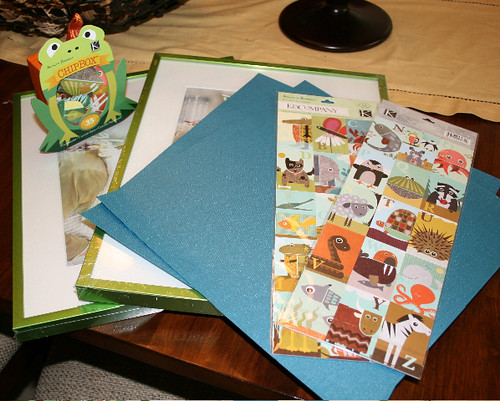


  • Jen Ski “Actopus to Zelephant” stickers (or something similar)
  • 2 11×14 “Brights” frames with 8×10 pre-cut matte included (though you could use any frame, or number of frames, that suit the style of your room).
  • 2 12×12 sheets of Bazzil Basics “Crystal Blue” Cardstock with canvas finish.  (again, use whatever matches your decor.  I liked how the stickers popped on this paper and I also liked the texture).
  • “Actopus to Zelephant” 35 piece chip Box
  • scotch tape
  • Double stick tape
  • paper scissors
  • clear ruler (I used my quilting ruler)
Don’t forget to print out a “50% off one item” coupon for Michael’s.  I got one of the frames for half price. Just google “Michael’s coupon” and you will find one.  Make sure it is for the current week.
Do NOT remove stickers from their backing at any point.  I cut each one apart individually.  I also rounded the corners, because, well I LOVE rounded corners (I used a corner rounder on every single insert that went into my 150 wedding invites.  That’s 3000 corners!).  This time I used scissors and cut VERY carefully.  They aren’t perfect, but you really can’t tell.  I left the backing on, because it gives each sticker stability, depth and makes them more card-like, plus you can move them around more easily if you want to change the layout.
Once the stickers are cut out, cut your blue canvas backing paper down to size (I cut 2″ off one side) and tape to the back of your pre-cut matte with scotch tape.
Place your stickers out on your backing and matte and decide on a pleasing layout.  Once I decided how the stickers should be laid out, I used my ruler to space the corner stickers and stuck them on with the double-stick tape.  They were very easy to move, if I changed my mind.  All the other stickers I simply eye-balled and stuck in place.
Once your stickers have been attached, lay out your chip board animals and also stick on with double-stick tape.  You could skip this step and leave the matte simple, or maybe add a matching ribbon border instead. It can be anything you want, so make it personal!
Once you have all your stickers and embellishments attached, pop it in the frame and you are ready to go!  
I think they go with the room decor very nicely:
  • Click to share on Pinterest (Opens in new window) Pinterest
  • Click to share on Facebook (Opens in new window) Facebook
  • Click to share on X (Opens in new window) X
  • More
  • Click to share on Tumblr (Opens in new window) Tumblr
  • Click to email a link to a friend (Opens in new window) Email
  • Click to share on LinkedIn (Opens in new window) LinkedIn

Comments:
3 Comments
Categories:
Uncategorized
Tags:
Actopus to Zelephant, Alphabet wall art, DIY nursery art, Jen Ski, K&Company, Michaels, safari nursery art

SIGN-UP FOR MY NEWSLETTER

Updates on pattern releases, discounts and more!

« Vintage Linen Scrappy Quilt
Finished “Spool” Bird Mobile »

Comments

  1. Melissa says

    July 6, 2009 at 3:55 pm

    Those are so cute! And good way to work around the 2 “extra” cards. PS. Love the crib bumper. Did you buy or make?

    Reply
  2. Sew Girly Alterations says

    July 6, 2009 at 4:00 pm

    Thanks! The bedding (besides the quilt), is from Dwell. I was lucky enough to be a guest on the Ellen DeGeneres “first-time mom” show and the bedding was one of our gifts. It matched everything so well, that I ditched my plans to make the rest of the bedding!

    Reply
  3. Melissa says

    July 6, 2009 at 8:40 pm

    Oh ya! Duh. I forgot about that. I’d love to be pregnant during that show!!! I think we have a dwell up here by us when that time does come.

    Reply

Leave a Reply to Melissa Cancel reply

Your email address will not be published. Required fields are marked *

This site uses Akismet to reduce spam. Learn how your comment data is processed.

© 2025 Better Off Thread