
This tutorial is step two in the photo tutorial for making my Spiral Geese Mini Quilt Pattern. If you aren’t making the pattern, but you are interested in learning my method for reverse appliqué, read on!
Step one: Paper-piecing Curved Geese is here.

Start by sewing your paper-pieced geese together in numerical order. You will create one large spiral.

Take your second set of patterns that you had set aside and cut them out along the black line (you will be cutting off the seam allowance).

Tape your paper templates together into one spiral.
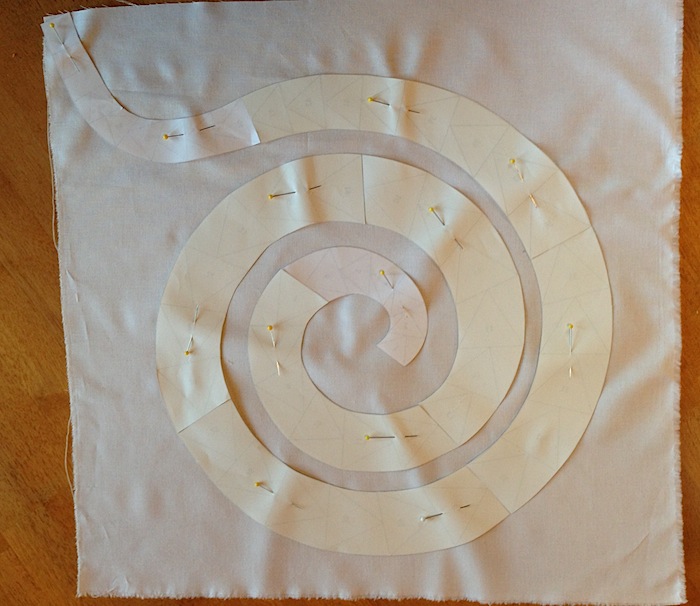
Lay your paper spiral face-down onto your background fabric. Pin.

Using a water-soluable fabric marker, trace the edge of your paper template and mark the seams where your templates have been taped together.

Mark a second line (cutting line) about 1/4″ INSIDE your original line. This can get tricky. Don’t draw your cutting line on the wrong side.
Don’t worry if your seam allowance isn’t exactly 1/4″. It just needs to be about that.

Cut along the inside line (your cutting line) the entire way around the spiral.

Now you have a spiral!

Lay your background on top of your paper-pieced spiral and match the tick marks you made on the background to the seams where you sewed your templates together.

Here is a close-up. Those blue tick marks are lined up with the template seams and the outer point of the triangle.

Fold your seam allowance under, matching the fold of your fabric to the points on the triangles.

You’ll need to clip the corners at the inner-most triangle, so you can fold the fabric under.

All pinned! At this point, you could hand-stitch the edge with a slip-stitch, but I prefer to do a quick basting stitch, so that I am not constantly sticking myself with pins, and getting my thread caught on them.

Here it is basted. You now have two choices: you can hand-stitch the edge down using a slip-stitch, or you can machine stitch right next to the edge.

I machine stitched this one. My original rainbow mini was slip-stitched by hand. Whichever you choose will probably blend in with your quilting in the end.

Here is a close-up of the machine stitched edge.
You can press out the wrinkles in the triangles by placing the batting under it and pressing each triangle lightly with a dry iron.
You did it!
Don’t forget to check out my Craftsy pattern if you are interested in making this mini!
Stunning mini! Thank you for sharing your technique with us – really clear tutorial!
Diane
Love the tutorial, you make look easy.
Nice tutorial. It looks like a lot of work but well worth the effort. I’ll have to try this sometime. I love =how you quilted the piece!
You make it look so easy.
This is stunning!
Got this pattern and made it in red and white to accompany other mini’s I am making in the same colorway. Yes, it was easy but I did hand sew the reverse applique, so that took a while. Love the way it turned out.. THANKS !!! it is wonderful.
That’s super cool. I’ve seen it and I’m still not sure I totally get it. I love stuff like that! You really have to TRY it to get a true feel for it. 🙂
Admire this pattern, and intend to try and make one for myself.
This is beautiful…
This is a lovely pattern and your tutorial is very clear so I can make it. I’m fairly new to quilting and would like more info on the actual quilting you did or where I can get more info on learning to design and sew the quilting patterns. The quilting often makes or breaks the outcome of the quilt itself. I have been sewing over 60 years.
I, too, would love some info on quilting this mini. I love what you did and would like to do something similar.
I love the pattern and am so glad I watched the tutorial before starting the 2nd half of this project, which was excellent. I’m making a rainbow one and will make more. Just love it! Thank you!!
Where can I watch the tutorial on this mini quilt?