Monthly Archives: August 2009

Scrappy String Quilt


My Inspiration.  A string quilt by Ashley at Film in the Fridge.

I found this tutorial over at Film in the Fridge and I couldn’t wait to try it out myself.  I hate waste, so I am always looking for uses for my fabric scraps.  I loved the look of Ashley’s quilt.  The thin strip of white brings everything together so nicely and making these blocks is really mindless (which will be great once the baby is born!).  There is no pattern to follow, you just sew strips together on a piece of paper.  I have all the strips ready to go and can just make a block here and there when I am in the mood. 

my stash of lovely strips:

Blocks I have made so far:

I am making my blocks 7″x7″, since many of my scraps are quite small, but I am not sure how big my quilt will be in the end, or how exactly I will lay it out.  I may do a white border around the outside. 


I just want to keep making more squares, but I have to put it aside for now and finish up some baby projects that are waiting.

Hip Handmaids

My friend, Debra, just showed me this new local group, Hip Handmaids, and I am SO excited about it!  

In the words of the founder:

“Hip Handmaids is born out of a bizarre group of talented housewives that have handcrafted, unique wares to sell. Each vendor has been crafting ever since they could hold a pair of safety scissors.  If you are searching for the perfect kitsch, or cleverly eco-friendly gift then we are your one stop shop. Coming to Burbank December 5th!!!!”

Hey, that’s me! (If I do say so, myself!).  I am totally bummed that I can’t enter to have a booth at their first show in December. Since I am 39 weeks pregnant, and will be adjusting to raising a newborn soon, I doubt I will have time to create an stock of wares by then, but I am definitely going to be in attendance.  Hopefully I can participate in the next one!

If you love crafting, creating, or just buying awesomely clever hand-made items, check it out!

Finished Stacked Coin Baby Quilt

I am so happy with how this quilt turned out.  It was so easy to cut and piece and the small size made it quick to stipple, but the results are impressive.  I think the stacked coin quilt is my new favorite pattern!

Riley finally gave up his sleeping spot, much to his dismay:

And after running out of white thread a couple times and dealing with needle issues (still need to get the hang of free-motion quilting), I have a finished travel quilt!


Front

I used white Kona Cotton for the sashing.

Back

I love the added touch of a pieced back.


I’m not sure if you can see this, but I quilted an Elephant into the blanket.  I wanted to try something different and I like how subtle it is.

I also stippled closer together:

Gotta love crinkly goodness!

I think I have been stippling too far apart, because I haven’t gotten this much crinkle before and I LOVE it.  


The next time I place this blanket on the grass, there had better be a baby on it!

Stacked Coin Baby Quilt Progress

Riley has claimed the coin quilt as his own.  It’s really hard to finish a quilt when there is a cute little kitty sleeping on it every time I walk away.


Baby Clothing Quilt

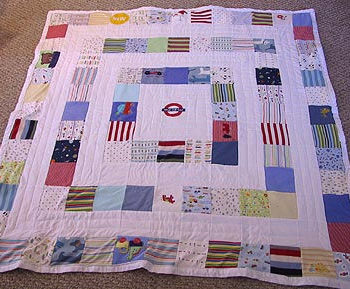
These keepsake quilts made from squares of baby clothing by Hillary at Wee Wonderfuls are SOOOOO adorable and the perfect way to bring back memories of your child as a tiny baby in all their cute outfits.   Each square is made from a piece of baby clothing that was too tattered, worn, or stained to give away, yet too near and dear to toss out.

I won’t be making one of these for a long time, but I will be sure to start my stash as our baby wears out his clothing.  

Hillary’s quilt for her son, Oscar.  Blogged here


Hillary’s Quilt for her daughter, Phoebe.  Blogged here.


There are lots more photos on Wee Wonderful’s Blog with links to photos of the babies wearing their outfits.  Check it out!


Stacked Coin Baby Quilt

What do you do when you are waiting for the baby to arrive?  Well you make another quilt, of course!

I have been really eager to try a stacked coin quilt since I saw this one at Sew-Handmade.  Since I have extra time and nursery fabric on my hands, I decided to make a smaller one from scrap fabrics. I loosely followed this tutorial at Moda.  I had a stack of 6″x6″ Amy Butler Midwest Modern squares, so I decided to make my coins 3″X6″ (including seam allowance).  That way I could do fewer rows, yet still make the quilt wide enough, since I was limited on my scrap fabric. I also made the “2-D Zoo” squares 5″x 6″ to show off the pattern and I staggered one in each row.

Here is the front all pinned and ready to be quilted:

The finished quilt is going to be about 31″x49″, so it really didn’t turn out that small in the end, even though it is meant to be a travel quilt.  It won’t be quite as near and dear to me as the nursery quilt, though, plus I am making it lighter weight, with a cotton backing instead of the minky that I used for the nursery quilt.  It should be perfect for laying the baby on the floor for tummy time when we are visiting the in-laws up in Tahoe, or my family back East.   I also hope the baby enjoys all the different prints!

The back:

The back is pieced and the main fabric is “Entertaining Elephants” by Alexander Henry.  I LOVE this fabric, so I was really glad I got utilize more than a 5″ square of it at a time.

Stacked coin quilts are so quick and easy to piece, especially if you use the charm packs from Moda instead of cutting scraps up like I did.  I would definitely suggest this for a first quilt.

I wasn’t too happy with the batting I used, so I am hoping it turns out ok when I wash it.  I normally use Bamboo batting, or “Warm and White”, but I had some 80/20 cotton/poly batting from Jo-Anns that I bought on sale awhile ago.  It pulled apart like cotton candy when I took it out of the package, so hopefully once it is quilted and washed it won’t desintegrate!  I am trying to work with supplies I already own, so it will have to do.

I am also considering trying a different quilting technique, or pattern.  I normally do free motion and sew a meandering “puzzle” pattern.  I thought maybe I should try something different this time, but I am a little nervous!

Also in the works is a gift for a friend who is having a little girl in November (I always seem to have to work on two projects at the same time), so I will show photos of that after I give it to her (Shhhhhh).  Some of the techniques I am trying here are practice for that gift.

My Newest Fabric Obsession

I want this “Have a Sheri Berry Holiday” fabric  SO badly that I think I look at it online 5 times a day!  I love the retro prints and pastel colors for Christmas.   I had to swear off fabric purchasing for awhile, since I am not working and I have several projects lined up already…BUT it’s ONLY $20 for 2 Moda coin packs…..argh…  It would make a really cute Christmas Stacked coin quilt.  Must resist…. (This is all said in a whiny voice, of course).


Superman Baby Blanket


Last Sunday was my husband’s birthday and we decided to have a low-key celebration in our backyard (seeing as I am full-term and ready to pop).  It is amazing to see how different our parties have gotten in the past year.  Most of our friends are having babies and there were 4 little ones at this shindig.  I felt a little bad for my “inside baby”, because he was missing out on all the fun!

One of the dads was holding his baby and had the receiving blanket draped across the little guy’s back for warmth as the evening grew cool.  My husband said, “There should be a baby blanket that looks like a Superman Cape!” and although I’m sure he forgot about it as soon as he said it, my creative, nesting mind started churning.

I honestly couldn’t decide if I should make the blanket as a classic red cape, with yellow and red emblem, or do a blue blanket with a red and yellow emblem (which I thought would look better, but I am a stickler for authenticity and I knew it wouldn’t REALLY be THE Superman cape).  I decided to combine both ideas and make it reversible. That way the stitching where the applique is sewn to the blanket would be concealed.

I bought 1 yard each of red and blue flannel from Jo-Ann’s and two rectangles of recycled plastic felt in red and yellow, so this project cost me about $6.50 (with coupons). I cut the flannel to match the size of a receiving blanket I already own and I rounded the corners using a canister of sugar as a guide (yes, I need a curved ruler).  

The classic Superman shield was easy to lay out.  I simply printed one out from an image search on the internet and then traced it onto “Lite Steam a Seam”  

I was not happy with how see-through the yellow felt was, when placed on the red flannel, so I added a white cotton backing.  This also acted as a great stabilizer when I appliqued the red and yellow felt together.

Here is a wonderful tutorial on sewing an applique at “Sew, Mama, Sew”.  Of course, Elizabeth at “Oh Fransson” wrote this detailed tutorial.  This was how I learned to do the applique on my baby blanket and it was SO easy, even though I was quite intimidated to get started.  I will just say that Lite Steam a Seam, and Sewer’s Aid are you friend! Also using the buttonhole stitch around the applique is ingenious.

The “Liam” shield was a little trickier, since I had to design it.  I thought of simply using an “L”, but it looked funny and didn’t fill the space within the shield well.  I ended up designing a shield in Photoshop, printing it out and sewing it the same way as the “S” shield.  You can also draw it by hand or use your design program of choice to layout the shield.  There are even talented super-fans out there who will design one for you.


Appliqueing the shield using the buttonhole setting:

There are actually 5 layers going on here: White Kona Cotton, Lite Steam a Seam, yellow felt, Lite Steam a Seam, and red felt.  I would highly suggest the Lite Steam a Seam, since it adds no bulk. This will keep your applique as soft as possible.

Close-up of stitching.  The zig-zag is quite narrow and I just grazed the edge of the red felt.

Sewing the applique to the flannel.   

Once the applique was assembled, I cut the white cotton down to about 1/8″ smaller than the outer edge of the shield.  MORE Steam a Seam was applied to the back of the applique to attach it to the flannel while I sewed it on.  I did not use pins on the applique at all during this entire process.

After the appliques were sewn to the flannel, I laid the two pieces of flannel with right sides together and stitched around them, leaving a 6″ opening in the bottom for turning.  I want to note that the blankets are also upside down from each other, so that the appliques do not fall on top of each other, creating extra bulk (does that make sense?).  Once sewn, I trimmed the seam allowances to 1/4″, pressed the seams open over a pressing ham, and turned and pressed flat.  The 6″ opening is hand stitched closed.

All done!

I am hoping the baby can also use the blanket as a costume when he is a little older.  I can attach velcro to the corners and he will be set to be a superhero!


Sewing Wet Bags, big and small.

In my efforts to collect my cloth diapering supplies, I wanted to find the perfect wet bags.  We already have a Diaper Genie in the the nursery, since we plan to use disposables part of the time, so I really didn’t want a second garbage pail cluttering up the room.   I asked around and I was directed to some super cute hanging wet bags that have a decorative outer fabric and waterproof inner fabric.  You hang them on the door knob and just throw it in the wash when clean your dirty diapers.

After looking around, I decided I wanted this one from Planet Wise:

Only, they didn’t offer it in a fabric that goes with our nursery, plus I couldn’t see paying the $30 for just one, when I know I needed two (a clean one, and one in the wash) and I had a TON of extra 2D zoo fabric.

I decided to make my own version and I am very happy with how it turned out.  I skipped the front pocket, but I did insert a zipper into the top.  

The inside is 1 mil PUL in baby blue from Verybaby.com:


PUL is short for Polyurethane Laminate.  It is waterproof on one side and soft on the other and has a slight stretch to it.  It is great for wetbags and cloth diapers.

I also wanted a travel wet bag for my diaper bag, so I made a smaller version with a wrist loop.

“Dilly Dally Diapers” has a great tutorial for sewing a wet bag here.

 Another great tutorial for sewing in a zipper is at “Twelve 22″

Both of these tutorials will show you how to sew a zippered bag with a detached lining.  You don’t want to sew the outer fabric and PUL together (except at the zipper), because you could get leaking (ewww).  My large wet bag is 16″x27″ and my small wetbag is 14″x14″. I cut my fabric with 1/2″ seam allowances. 

 I plan on making two more, but I want to see these in action first, to see if I need to make any adjustments (such as a shorter handle, or a snap on the handle).  They are very quick to make, though!


I’ve been blogged!

My Jenn Ski Alphabet Art I made for the nursery was blogged over at Tiny Decor (the original source for my inspiration).  They were asking for photos of projects that had been inspired by their Alphabet Card Mural, so I gladly sent them a photo.  Thanks, Jackie!

Check it out here!